AI Script Assistant
The AI Script Assistant uses natural language descriptions of control logic or data processing workflows to automatically generate C# scripts that comply with syntax specifications. It also supports explanation, debugging, and optimization of existing scripts. Its core purpose is to rapidly complete script-based engineering development.
Feature Description
- Supports describing trigger conditions and operation steps (e.g., data reading, API calls, tag updates) for scripts via natural language; the AI automatically generates compliant C# scripts.
- Analyze uncommented or obscure engineering scripts line by line, generating clear functional descriptions to reduce the learning curve.
- Provides intelligent troubleshooting and optimization suggestions for script runtime errors (e.g., logic flaws, data parsing failures) or efficiency issues, reducing debugging time.
- Supports uploading attachments in the conversation, providing interface documents, script specifications, error messages, or business descriptions as context to the AI.
Core Advantages
1. Lowers the Programming Barrier
OT engineers without a professional programming background (e.g., process engineers, electrical engineers) can complete system integration and data processing script development without deeply learning C# syntax.
Traditional Approach vs. AI Approach:
Traditional Approach:
Learn C# syntax → Learn API documentation → Write code → Debug errors → Optimize performance
Requires: Programming ability + significant learning time

AI Approach:
Describe requirements → AI generates code → Test and verify → Fine-tune optimization
Requires: Ability to express logic clearly
2. Improves Script Quality and Efficiency
- Syntax Compliance: Generated scripts conform to industrial programming standards, reducing syntax errors.
- Exception Handling: Automatically adds necessary exception handling logic to improve script robustness.
- Performance Optimization: The optimization feature improves script execution efficiency and reduces system resource usage.
- Code Comments: Automatically adds clear comments for easier maintenance.
- Attachment Understanding: Understands business context, interface fields, and script constraints based on user-uploaded attachments, reducing the need for repeated explanations.
3. Accelerates Engineering Knowledge Transfer
Quickly explains the functionality of legacy scripts, helping new engineers or maintenance personnel get up to speed quickly and preventing knowledge loss due to personnel changes.
Scenario Example:
- Taking over an old project with hundreds of lines of uncommented code.
- Traditional approach: Read and understand line by line, potentially taking days.
- AI approach: Paste the code, generates a functional description, understand the core logic within 30 minutes.
Typical Scenarios
Scenario 1: Third-Party System Integration Script Development
Background: Production data needs to be reported to the MES system or production orders retrieved from the ERP.
Requirement Description:
When the work order ID changes, obtain MES data via API and write it to local tags.

Specific requirements:
- Monitored tag: Work Order ID
- API address: http://mes.company.com/api/getWorkOrder
- Request method: POST
- Request parameters: {"order Id": "Work Order ID value"}
- Returned data: {"productModel": "Product model", "targetQty": Target quantity}
- Write to tags: Product Model, Target Quantity
**AI-generated script: **
using System;
using System.Net.Http;
using System.Text;
using Newtonsoft.Json;

public class MESIntegration
{
    private string lastWorkOrderID = "";

    public void OnWorkOrderChanged(string currentWorkOrderID)
    {
        // Check if work order ID has changed
        if (currentWorkOrderID != lastWorkOrderID && !string.IsNullOrEmpty(currentWorkOrderID))
        {
            lastWorkOrderID = currentWorkOrderID;

            try
            {
                // Call MES API to get work order data
                var workOrderData = GetWorkOrderFromMES(currentWorkOrderID);

                // Write to local tags
                CMS.SetTag("ProductModel", workOrderData.ProductModel);
                CMS.SetTag("TargetQuantity", workOrderData.TargetQty);

                CMS.Log($"Work order data retrieved successfully: {workOrderData.ProductModel}, Target quantity: {workOrderData.TargetQty}");
            }
            catch (Exception ex)
            {
                CMS.LogError($"Failed to get MES data: {ex.Message}");
            }
        }
    }

    private WorkOrderData GetWorkOrderFromMES(string orderId)
    {
        using (var client = new HttpClient())
        {
            // Set timeout
            client.Timeout = TimeSpan.FromSeconds(10);

            // Build request content
            var requestData = new { orderId = orderId };
            var jsonContent = JsonConvert.SerializeObject(requestData);
            var content = new StringContent(jsonContent, Encoding.UTF8, "application/json");

            // Send POST request
            var response = client.PostAsync("http://mes.company.com/api/getWorkOrder", content).Result;
            response.EnsureSuccessStatusCode();

            // Parse response data
            var responseJson = response.Content.ReadAsStringAsync().Result;
            return JsonConvert.DeserializeObject<WorkOrderData>(responseJson);
        }
    }
}

public class WorkOrderData
{
    public string ProductModel { get; set; }
    public int TargetQty { get; set; }
}
Value:
- No need to manually write complex HTTP request code.
- Automatically handles exceptions.
- Shortens system integration engineering cycles from days to hours.
Scenario 2: Maintaining Legacy Project Scripts
Background: Taking over an old project script without comments, needing to quickly understand its functionality.
Original Script (no comments):
public void Process()
{
    var v1 = CMS.GetTag("V001");
    var v2 = CMS.GetTag("V002");
    if (v1 > 100 && v2 < 50)
    {
        CMS.SetTag("V003", 1);
        CMS.CallAPI("http://api/alarm", "POST", "{\"type\":\"high\"}");
    }
    else
    {
        CMS.SetTag("V003", 0);
    }
}
Ask the AI:
Please explain the functionality of this script.
AI Explanation:
This script performs monitoring and alarm handling:

1. Reads two tags:
   - V001: monitored value such as temperature or pressure
   - V002: another related parameter

2. Condition evaluation:
   - When V001 is greater than 100 (exceeds threshold)
   - AND V002 is less than 50 (below normal value)
   - Trigger alarm only when both conditions are met

3. Alarm handling:
   - Set V003 to 1 (alarm status flag)
   - Call external API to send a high-level alarm notification

4. Normal state:
   - When alarm conditions are not met, set V003 to 0 (normal state)

Suggestions:

- Use meaningful names for tags (e.g., Temperature, Pressure)
- Define thresholds 100 and 50 as constants for easier adjustment later
- Add exception handling to prevent API call failures from affecting the main flow
Value:
- Quickly understand legacy code logic.
- Reduce maintenance time.
- Receive optimization suggestions.
Scenario 3: Script Debugging and Optimization
Background: Script has runtime errors or low efficiency.
Problematic Script:
public void UpdateData()
{
    for (int i = 0; i < 1000; i++)
    {
        var data = CMS.GetTag("Sensor_" + i);
        CMS.WriteToDatabase("INSERT INTO data VALUES (" + i + ", " + data + ")");
    }
}
Ask the AI:
This code performs poorly. How can it be optimized?
AI Optimization Suggestions:
Problem analysis:
- Frequent database insert calls inside a loop, very poor performance.
- String concatenation method is unsafe and has SQL injection risk.
- No batch processing mechanism.
Optimized solution:
public void UpdateData()
{
    // Use batch insert to improve performance
    var dataList = new List<SensorData>();

    // Collect all data first
    for (int i = 0; i < 1000; i++)
    {
        var data = CMS.GetTag($"Sensor_{i}");
        dataList.Add(new SensorData { Id = i, Value = data });
    }

    // Batch write to database (more than 100x performance improvement)
    CMS.BatchInsertToDatabase("data", dataList);

}

public class SensorData
{
    public int Id { get; set; }
    public double Value { get; set; }
}
Performance Comparison:
- Before optimization: 1000 database operations, takes about 10-30 seconds.
- After optimization: 1 batch operation, takes about 0.1-0.3 seconds.
- Performance improvement: more than 100x.
Value:
- Identify performance bottlenecks.
- Provide optimization solutions.
- Improve script execution efficiency.
Scenario 4: Generating Scripts with Attachments
Background: Engineers already have interface documents, script specifications, or device point table descriptions and do not want to manually compile them into long paragraphs of text.
How to use:
Upload attachments: MES interface description, tag point table, script specification.

Requirement description:
Based on the interface fields and tag points in the attachments, generate a work order data synchronization script.
Requirements:
1. Write to CMS tags according to the tag naming in the attachments.
2. Log errors when the interface encounters exceptions.
3. Keep comments for key business steps.
Value:
- Reduces manual effort of copying interface fields and point table descriptions.
- Allows the AI to generate scripts based on complete materials, reducing omissions of key constraints.
- Suitable for tasks that rely on rich context such as interface documents, error logs, and script specifications.
5-Minute Quick Start
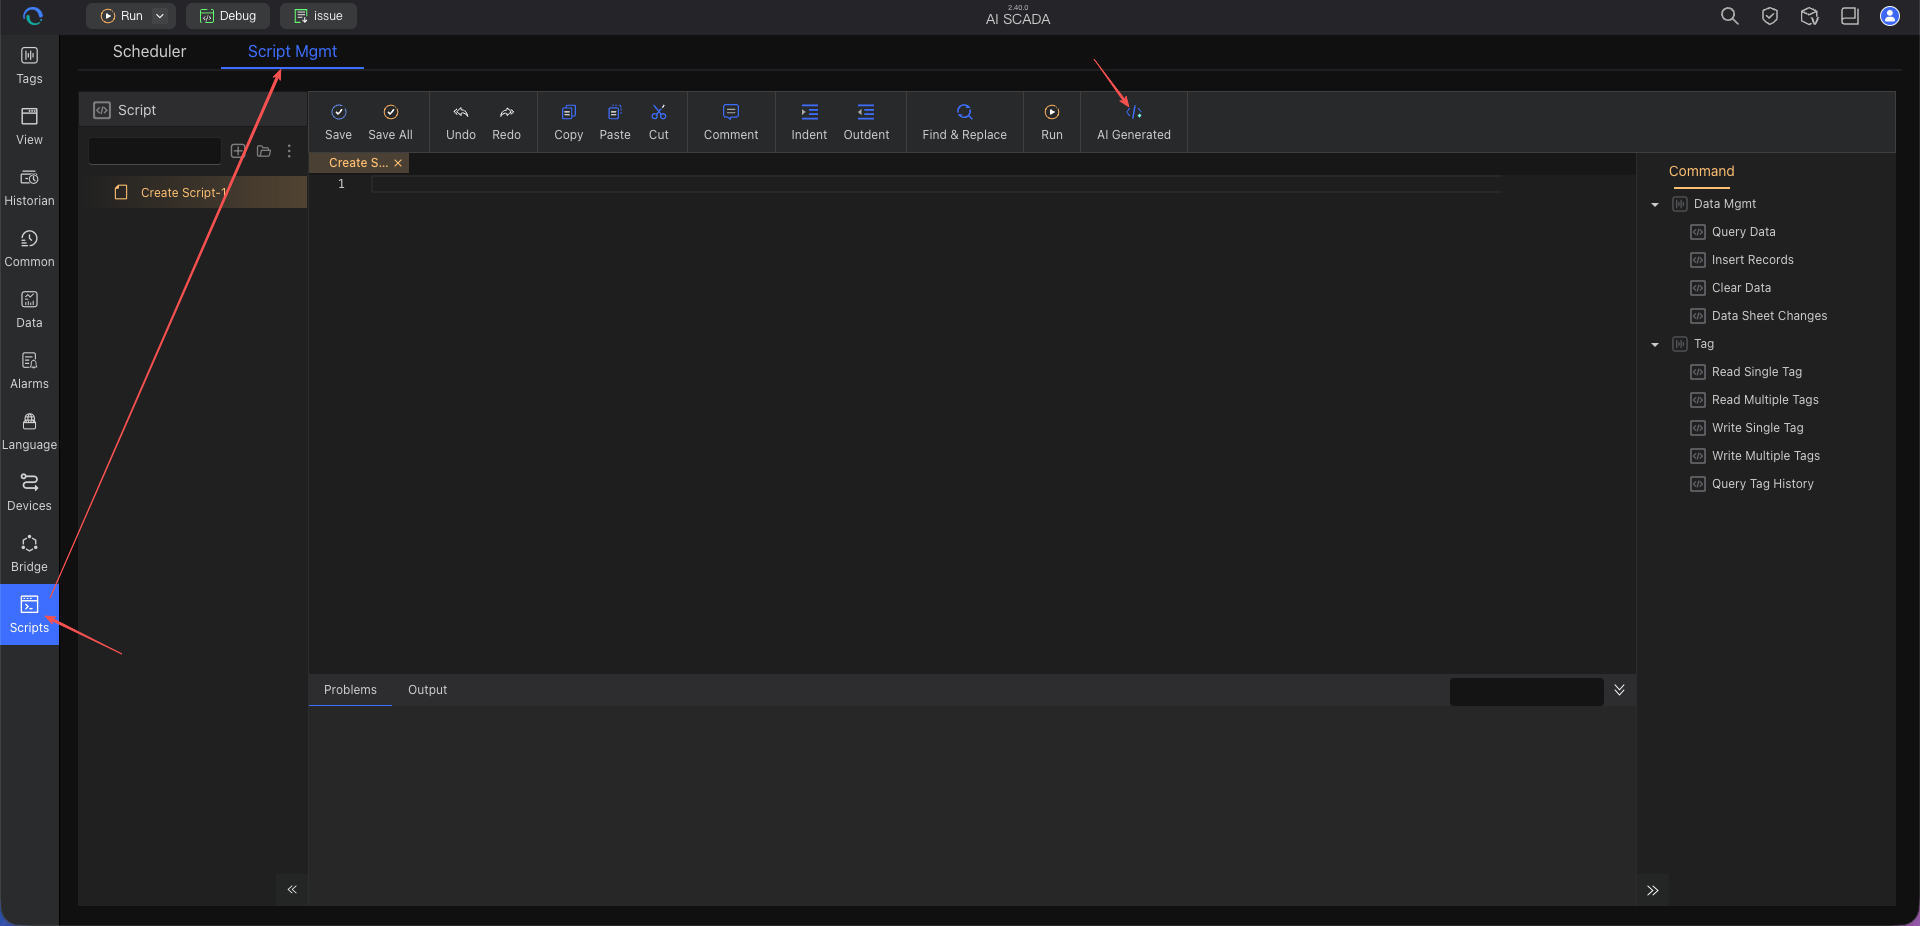
Step 1: Open the AI Script Assistant
In the script editor, click the "AI Assistant" icon on the toolbar, or right-click and select "AI-assisted writing".
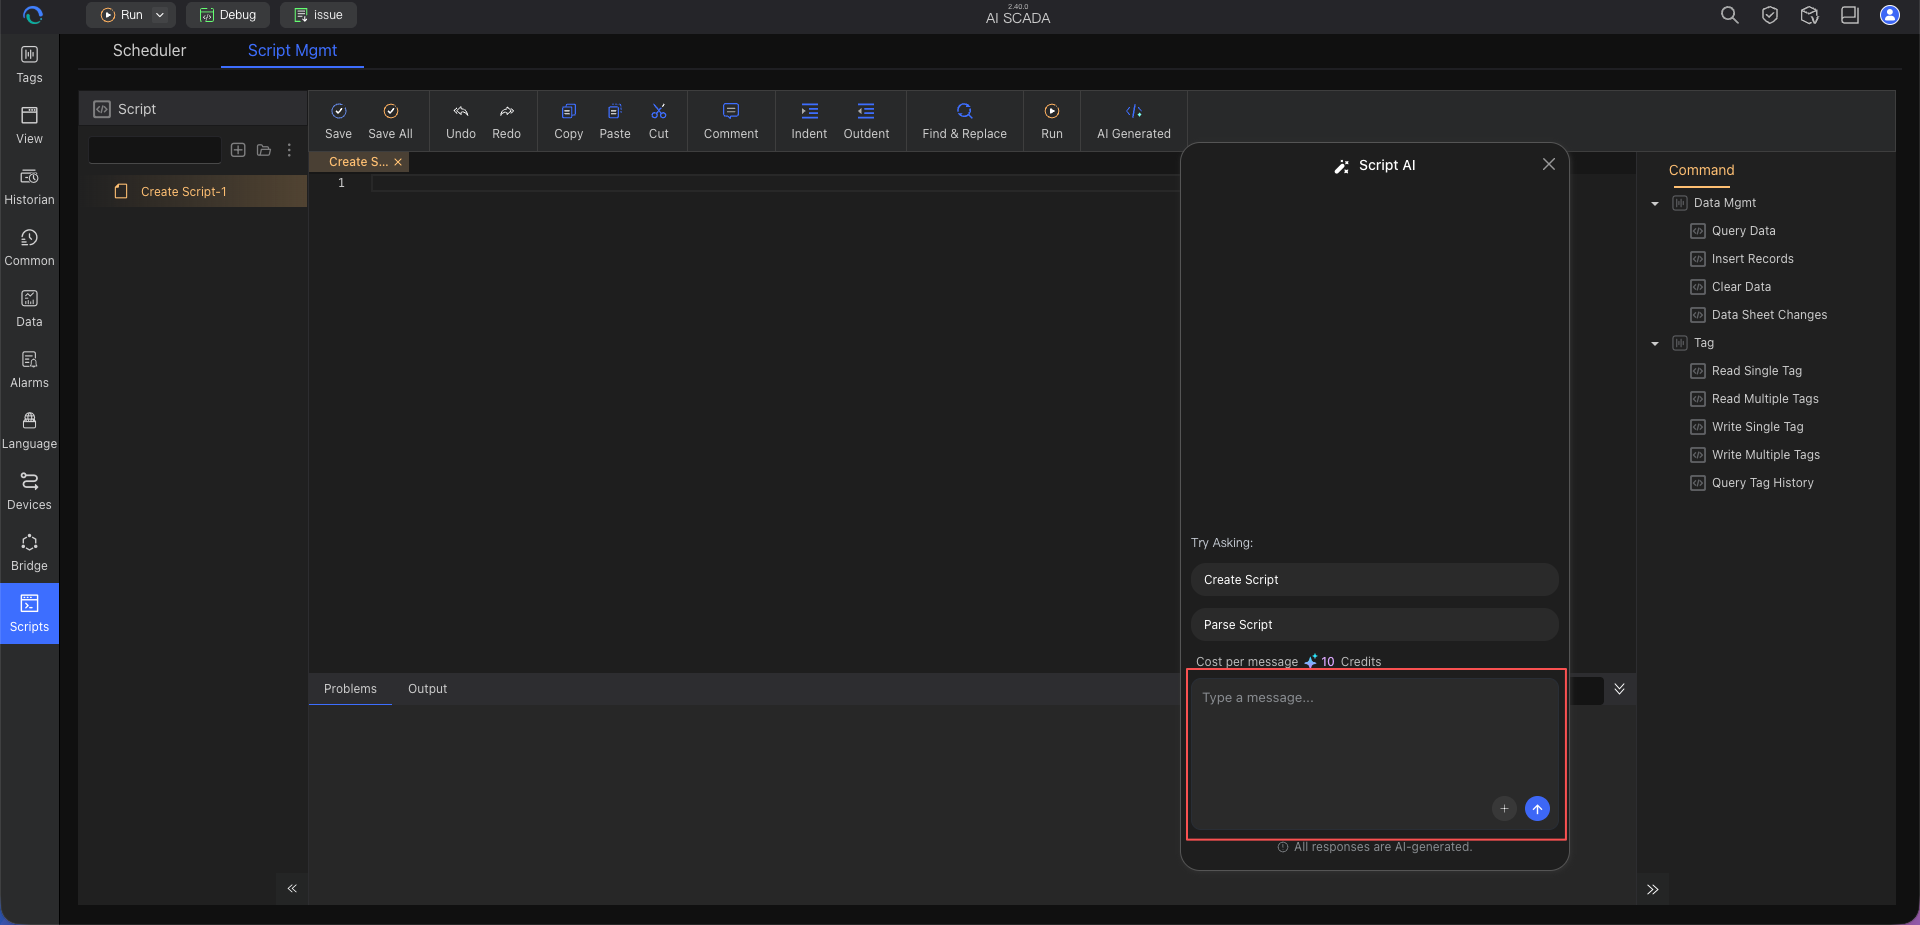
Step 2: Describe Your Requirements
Enter your requirements in the dialog. You can:
- Generate a new script: Describe the functionality you need.
- Explain an existing script: Paste the code and request an explanation.
- Debug/optimize: Paste the problematic code and describe the issue.
- Process with attachments: Upload interface documents, tag point tables, script specifications, or error logs, and have the AI generate, explain, or optimize scripts based on the attachment content.
Step 3: Confirm Script Version
If there are unsaved changes in the current script, the system will display a prompt: "The script has unsaved changes. Do you want to save before submitting the conversation?":
- Save and submit: Save the current script first. After saving successfully, the AI message will be sent automatically, and the AI will continue based on the latest script content.
- Submit directly: Do not save the current changes, send the AI message directly. The AI will continue based on the last saved version.
- Cancel: Do not save or submit, keep the current editing state unchanged.
If the prompt is already shown, triggering send again will not create a duplicate prompt.
Step 4: Wait for the AI to Generate
The AI will analyze the requirements, the current script content, and any uploaded attachments within 5-15 seconds, then generate code or an explanation.
Step 5: Test and Verify
- Copy the generated code to the script editor.
- Run and verify it in a test environment.
- Fine-tune as needed based on actual conditions.
Step 6: Deploy to Production
After successful testing, deploy to the production environment.
Prompting Tips (For Accurately Generating/Debugging Scripts)
Tip 1: Script Generation – "Condition-Action" Structure
Clearly describe trigger conditions and actions to perform.
Example 1 – Simple conditional trigger:
When the tag "Scan Completed" is true,
call the MES API endpoint "api/check_material" based on the scan result.
Example 2 – Complex condition combination:
Trigger an alarm when all the following conditions are met:
1. Temperature > 80 degrees
2. Pressure < 2 bar
3. Equipment status is "Running"

After triggering, execute:
1. Set alarm flag to true
2. Send email notification
3. Record alarm log to database
Example 3 – Data processing script:
Write a script that does the following:
1. Read the production log CSV file under D:\reports
2. Parse the file content
3. Insert the data into the "daily_log" table in the database
4. Back up the file to the D:\backup directory
5. Delete backup files older than 7 days

Note: This script can be configured via the scheduled tasks module to run automatically at 1 AM every day.
Tip 2: Specify Data Sources and Destinations
Indicate where the data comes from and where it should be written.
Example 1 – API Integration:
Write a script that does the following:

Data source:
- API URL: http://erp.company.com/api/orders
- Request method: GET
- Authentication: Bearer Token (obtained from tag "ERPToken")

Data processing:
- Parse the returned JSON array
- Filter orders with status "pending"
- Extract fields: orderNo, productCode, quantity

Data destination:
- Write to CMS tag: CurrentOrders (JSON string)
- Also write to database table "order_queue"
Example 2 – File processing:
Write a script to read an Excel file and import data:
File path: D:\import\products.xlsx
Worksheet: Sheet1
Columns to read: A (product code), B (product name), C (inventory quantity)

Processing logic:
- Skip the first row (header row)
- Validate product code format (must start with P followed by 6 digits)
- Inventory quantity must be greater than 0

Write destination:
- Database table "products"
- If product code already exists, update inventory quantity
- If it does not exist, insert a new record
Tip 3: Describe Complex Processes Step by Step
Break down multi-step requirements and generate them in stages before combining.
Example – Scan-to-inbound process:
Step 1: Get scan data
Write a script to listen for barcode scanner input:
- Monitored tag: ScanCode
- Trigger when the tag value changes
- Validate scan format: 20 digits
- Store valid scan in tag: ValidScanCode
Step 2: Call MES query
Use ValidScanCode to call the MES API and query material information:
- API: http://mes/api/getMaterial
- Parameters: {"barcode": "barcode"}
- Return: {"materialCode": "material code", "materialName": "material name", "batch": "batch"}
- Parse and store in tags: MaterialCode, MaterialName, Batch
Step 3: Write to database
Write material information to the inbound records table:
- Table name: inbound_records
- Fields: barcode, material_code, material_name, batch, inbound_time
- inbound_time uses current time
- After successful write, set tag InboundSuccess to true
Tip 4: Provide Context Information
Provide necessary background information to help the AI better understand the requirements.
Example:
Background: Our production line has 5 devices, each with 10 sensors.

Requirement: Write a script to calculate equipment health scores.

Calculation logic:
- Read the 10 sensor data values for each device (tag naming: Device1_Sensor1 to Device5_Sensor10)
- Each sensor has a normal range (stored in the configuration table sensor_config)
- If the sensor value is within the normal range, award 1 point; otherwise 0 points.
- Equipment health score = number of normal sensors / total sensors * 100%
- Write each device's health score to tags: Device1_Health to Device5_Health
- If the health score is below 80%, trigger an alarm.
Tip 5: Upload Attachments to Supplement Context
When requirements depend on materials such as interface documents, tag point tables, error logs, or script specifications, you can upload attachments and indicate which parts the AI should focus on.
Example:
I have uploaded the MES interface documentation and the tag point table.

Please generate a work order synchronization script based on the attachments:
1. Use the work order query interface from the interface document.
2. Write to CMS tags according to the tag names in the point table.
3. If any required fields in the attachments are missing, log an error in the script.
4. Keep comments for key steps in the generated script.
The supported attachment formats depend on the current model’s capabilities and the ShengYun platform configuration. Please refer to the prompts on the page before uploading.
Prompt Template Library
Template 1: API Data Retrieval
Write a script to fetch data from an API:

API information:
- URL: [API_URL]
- Method: [GET/POST]
- Authentication: [authentication method]
- Parameters: [parameter description]

Data processing:
- Parse the returned [JSON/XML]
- Extract fields: [field list]
- Data validation: [validation rules]

Write destination:
- CMS tags: [list of tag names]
- Database table: [table name] (optional)

Exception handling:
- If the API call fails, log the error
- Set timeout to [X] seconds
Template 2: Database Operations
Write a script to perform database operations:

Operation type: [query/insert/update/delete]

Database information:
- Table name: [table_name]
- Fields: [field1, field2, field3]

Operation logic:
- Trigger condition: [condition description]
- Data source: [CMS tag/API/file]
- Processing rules: [business rules]

Result handling:
- Success: [actions after success]
- Failure: [handling after failure]
Template 3: Data Processing Script
Write a data processing script:

Tasks:
1. [first step]
2. [second step]
3. [third step]

Data processing:
- Data source: [source description]
- Processing logic: [processing rules]
- Output destination: [destination description]

Exception handling:
- How to handle task failures
- Logging requirements

Note: After the script is written, trigger conditions (e.g., daily at X time / hourly / every X minutes) can be configured in the scheduled tasks module to execute this script automatically.
Template 4: Conditional Monitoring
Write a conditional monitoring script:

Monitored tags: [list of tags]

Trigger conditions:
- Condition 1: [condition description]
- Condition 2: [condition description]
- Logical relationship: [AND/OR]

Trigger actions:
1. [action 1]
2. [action 2]
3. [action 3]

Recovery condition:
- [recovery condition description]

Recovery actions:
- [actions after recovery]
Template 5: Generate/Optimize Scripts Based on Attachments
I have uploaded the following attachments:
- [Attachment 1 name]: [Purpose, e.g., interface document / tag point table / error log / script specification]
- [Attachment 2 name]: [Purpose]

Based on the attachments, complete the script task:
- Task objective: [Generate new script / Explain script / Fix error / Optimize performance]
- Key references: [Sections, fields, or error messages the AI should focus on]
- Output requirements: [Code style, comment requirements, exception handling requirements]
- Verification method: [How to determine if the script executed successfully]

If any information is missing from the attachments, please first list the questions that need to be addressed.
Frequently Asked Questions
Q1: Can AI-generated scripts be used directly in production?
A: Not recommended. The correct workflow is:
- AI generates initial code.
- Run and verify in a test environment.
- Check that exception handling is complete.
- Performance testing.
- Deploy to production only after thorough testing.
Q2: What if the AI-generated code has syntax errors?
A:
- Check whether the requirement description is clear and complete.
- Redescribe the requirements, providing more context.
- Provide the error message to the AI and ask for a fix.
- Manually correct obvious syntax errors.
Q3: How can I make the AI generate code that better fits my project's standards?
A: When describing requirements, explicitly state:
- Naming conventions (e.g., use camelCase for tags naming).
- Comment requirements (e.g., add functional descriptions for each method).
- Exception handling requirements.
- Logging requirements.
Q4: How complex a script can the AI handle?
A: Recommendations:
- Simple scripts (under 50 lines): generate directly.
- Medium complexity (50-200 lines): generate module by module.
- Complex scripts (over 200 lines): generate step by step and combine gradually.
Q5: How can I optimize the performance of AI-generated code?
A:
- After generation, ask the AI: "How can I optimize the performance of this code?"
- The AI will analyze performance bottlenecks and provide optimization suggestions.
- Test the optimization effect in a real environment.
Q6: What attachments does the Script Assistant support?
A: The Script Assistant supports uploading attachments to provide context for script generation, explanation, and debugging, such as interface documents, tag point tables, script specifications, error logs, or business descriptions. The specific file formats depend on the current model’s capabilities and the ShengYun platform configuration. Please refer to the upload interface prompts on the page.
Q7: What happens if I send an AI message while the script has unsaved changes?
A: When there are unsaved changes in the script, a confirmation prompt will appear before sending: "The script has unsaved changes. Do you want to save before submitting the conversation?"
- Save and submit: The current script is saved first, then the AI message is sent. The AI continues based on the latest script content.
- Submit directly: The current changes are not saved, the AI message is sent directly. The AI continues based on the last saved version.
- Cancel: Do not save or submit, keep the current editing state.
If the prompt is already shown, triggering send again will not create a duplicate prompt.
Best Practices
1. Be Specific in Requirement Descriptions
Each generation or modification consumes 10 credits, so describe clearly in one go to avoid repeated revisions.
❌ Bad description:
Write a script to read data.
✅ Good description:
Write a script to read 10 temperature sensor data points from the PLC (tag names: Temp1 to Temp10),
calculate the average, and trigger an alarm if the average exceeds 80 degrees.
2. Provide Complete Context
Include:
- Data source and format.
- Business rules and logic.
- How to handle exceptional situations.
- Performance requirements.
3. Handle Complex Logic Step by Step
For particularly complex scripts, you can generate them module by module before combining. However, note that each generation consumes 10 credits. Recommendations:
- Plan module division first.
- Describe each module clearly in one go.
- Finally, ask the AI to integrate all modules.
4. Make Good Use of the Code Explanation Feature
When encountering code you don't understand, ask the AI to explain it to deepen your understanding. Each explanation consumes 10 credits, so it is advisable to ask multiple questions in one go to improve efficiency.
5. Explain the Purpose Before Uploading Attachments
Attachments reduce manual effort, but it is still recommended to state the purpose of the attachment and the scope of interest in your request, for example: "Please focus on the interface fields in Chapter 3" or "Please locate the cause of the error based on the error log." This helps the AI understand the materials more accurately.
6. Confirm the Script Version Before Submitting
If the system prompts that the script has not been saved, choose according to your actual intention:
- If you want the AI to continue based on the current editing content, select Save and submit.
- If you only want to ask a question based on the last saved version, select Submit directly.
- If you still need to continue editing, select Cancel.
7. Build a Script Template Library
Save commonly used and effective scripts as templates to improve team efficiency.
8. Test-Driven Development
After the script is generated, write test cases first to verify functional correctness.
9. Code Review
AI-generated code also requires manual review, paying special attention to:
- Security (SQL injection, XSS, etc.)
- Completeness of exception handling
- Whether performance meets requirements
Next Steps
-
API Integration Assistant – If the script logic involves standard HTTP API integration, prioritize learning about API interconnection configuration and pre-debugging.
-
AI Model Assistant – After mastering script development, next learn about 3D equipment model generation to prepare model assets for pages and digital twin scenarios.
-
AI Image Assistant – Continue learning about generating equipment images, background images, and schematic diagrams to supplement page visual assets.
-
Usage Tips & Best Practices – After completing the main assistants, systematically study prompt writing, cross-assistant collaboration workflows, and team usage standards.